Purpose & Goal
In this example we will create a field that will work like the standard Category property on Post. The field will have its own distinct set of tags that won't be mixed with the standard Categories/Tags. When adding or editing a post the editor should be able to select one of the previously created tags or create a new one on the fly.
Limitations
In this example, a single storage will be used for the field. This means that all posts from all archives will share the same tags when using this field as opposed to the built-in categories/tags that are unique per archive. This is of course something that can be extended on.
Another limitation is that the example won't automatically clean unused tags from the list, again this is something that could be added but has been left out for the sake of simplicity.
How Should We Store The Options
The first question is how we should store the options. There are many alternatives here, the most complete of course being setting up a custom DbContext with tables for storing Tags and their relations to Posts. In this example we will do a simpler solution where we will store the created options as a semicolon separated string in a custom Param.
The Field
using System;
using System.Collections.Generic;
using System.Linq;
using System.Threading.Tasks;
using Piranha;
using Piranha.Extend;
using Piranha.Models;

namespace MyWebApp.Models.Fields
{
    [FieldType(Name = "Custom Tag", Component = "custom-tag")]
    public class CustomTagField : IField
    {
        // The selected value. This will be stored in the database.
        public string Value { get; set; }

        // The previously created options from other posts.
        public IList<string> Options { get; set; } = new List<string>();

        // The title when used in a list region.
        public string GetTitle()
        {
            return Value;
        }

        // Initializes the field
        public async Task Init(IApi api)
        {
            // Get the options param
            var param = await api.Params.GetByKeyAsync("CustomTagFieldOptions");

            if (param != null)
            {
                // We found the param, let's split the string value and assign
                // the options if it's not empty.
                if (!string.IsNullOrEmpty(param.Value))
                {
                    Options = param.Value.Split(';', options: StringSplitOptions.RemoveEmptyEntries)
                        .OrderBy(s => s).ToList();
                }
            }
            else
            {
                // No existing param, let's create it.
                param = new Param
                {
                    Key = "CustomTagFieldOptions"
                };
            }

            // Check that the selected value exists in the options,
            // if it doesn't, let's add it
            if (!string.IsNullOrEmpty(Value) && !Options.Contains(Value))
            {
                Options.Add(Value);
                Options = Options.OrderBy(s => s).ToList();

                param.Value += $";{ Value }";
                await api.Params.SaveAsync(param);
            }
        }
    }
}
The interesting part here is of course the Init method. This is where we get the previously created options and add to our Options property which will be used in the Manager to show existing Tags.
If you have a sharp eye you will notice that we actually add the new value into the option param on Init, which actually happens when the model is loaded and not saved. This is simply because there's no hook available on field level for when the model is saved. On the other hand, when used from the Manager the model is loaded back directly after it has been saved so the implications in this scenario are very small.
The Serializer
using System;
using Piranha.Extend;

namespace MyWebApp.Models.Fields
{
    public class CustomTagFieldSerializer : ISerializer
    {
        // When we serialize, ONLY store the selected option
        public string Serialize(object obj)
        {
            if (obj is CustomTagField)
            {
                return ((CustomTagField)obj).Value;
            }
            throw new ArgumentException();
        }

        // Create a new field from the given string
        public object Deserialize(string str)
        {
            return new CustomTagField
            {
                Value = str
            };
        }
    }
}
The whole purpose of the serializer is to only store the selected value on the actual field. With the default JSON serializer all of the options would be stored in the database as well. Storing only the value also makes it easier to use the field as a filter in database queries.
The Vue Component
Vue.component("custom-tag", {
  props: ["uid", "toolbar", "model", "meta"],
  mounted: function () {
    var self = this;

    $("#" + self.uid).select2({
      tags: true,
      selectOnClose: true,
      placeholder: piranha.resources.texts.addTags
    });
    $("#" + self.uid).on("change", function() {
      var item = $(this).find("option:selected").text();
      self.model.value = item;
    });
  },
  template:
    "<select class='form-control' :id='uid' v-model='model.value'>" +
    "  <option :value='item' v-for='item in model.options'>{{ item }}</option>" +
    "</select>"
});
In the Manager Component we take advantage of the fact that the Manager already includes Select2 for select lists. Other than that there's no real magic happening in the component which is very lightweight.
The Startup
Last but not least we need to register the different components we've created in the application. We do this by adding the following code in the Configure method of our Startup.cs.
// Register the field
App.Fields.Register<Models.Fields.CustomTagField>();

// Register the serializer
App.Serializers.Register<Models.Fields.CustomTagField>(
    new Models.Fields.CustomTagFieldSerializer());

// Add the script with the manager component. Change to where your js is located
App.Modules.Get<Piranha.Manager.Module>().Scripts.Add("~/assets/js/custom-tag.js");
Result
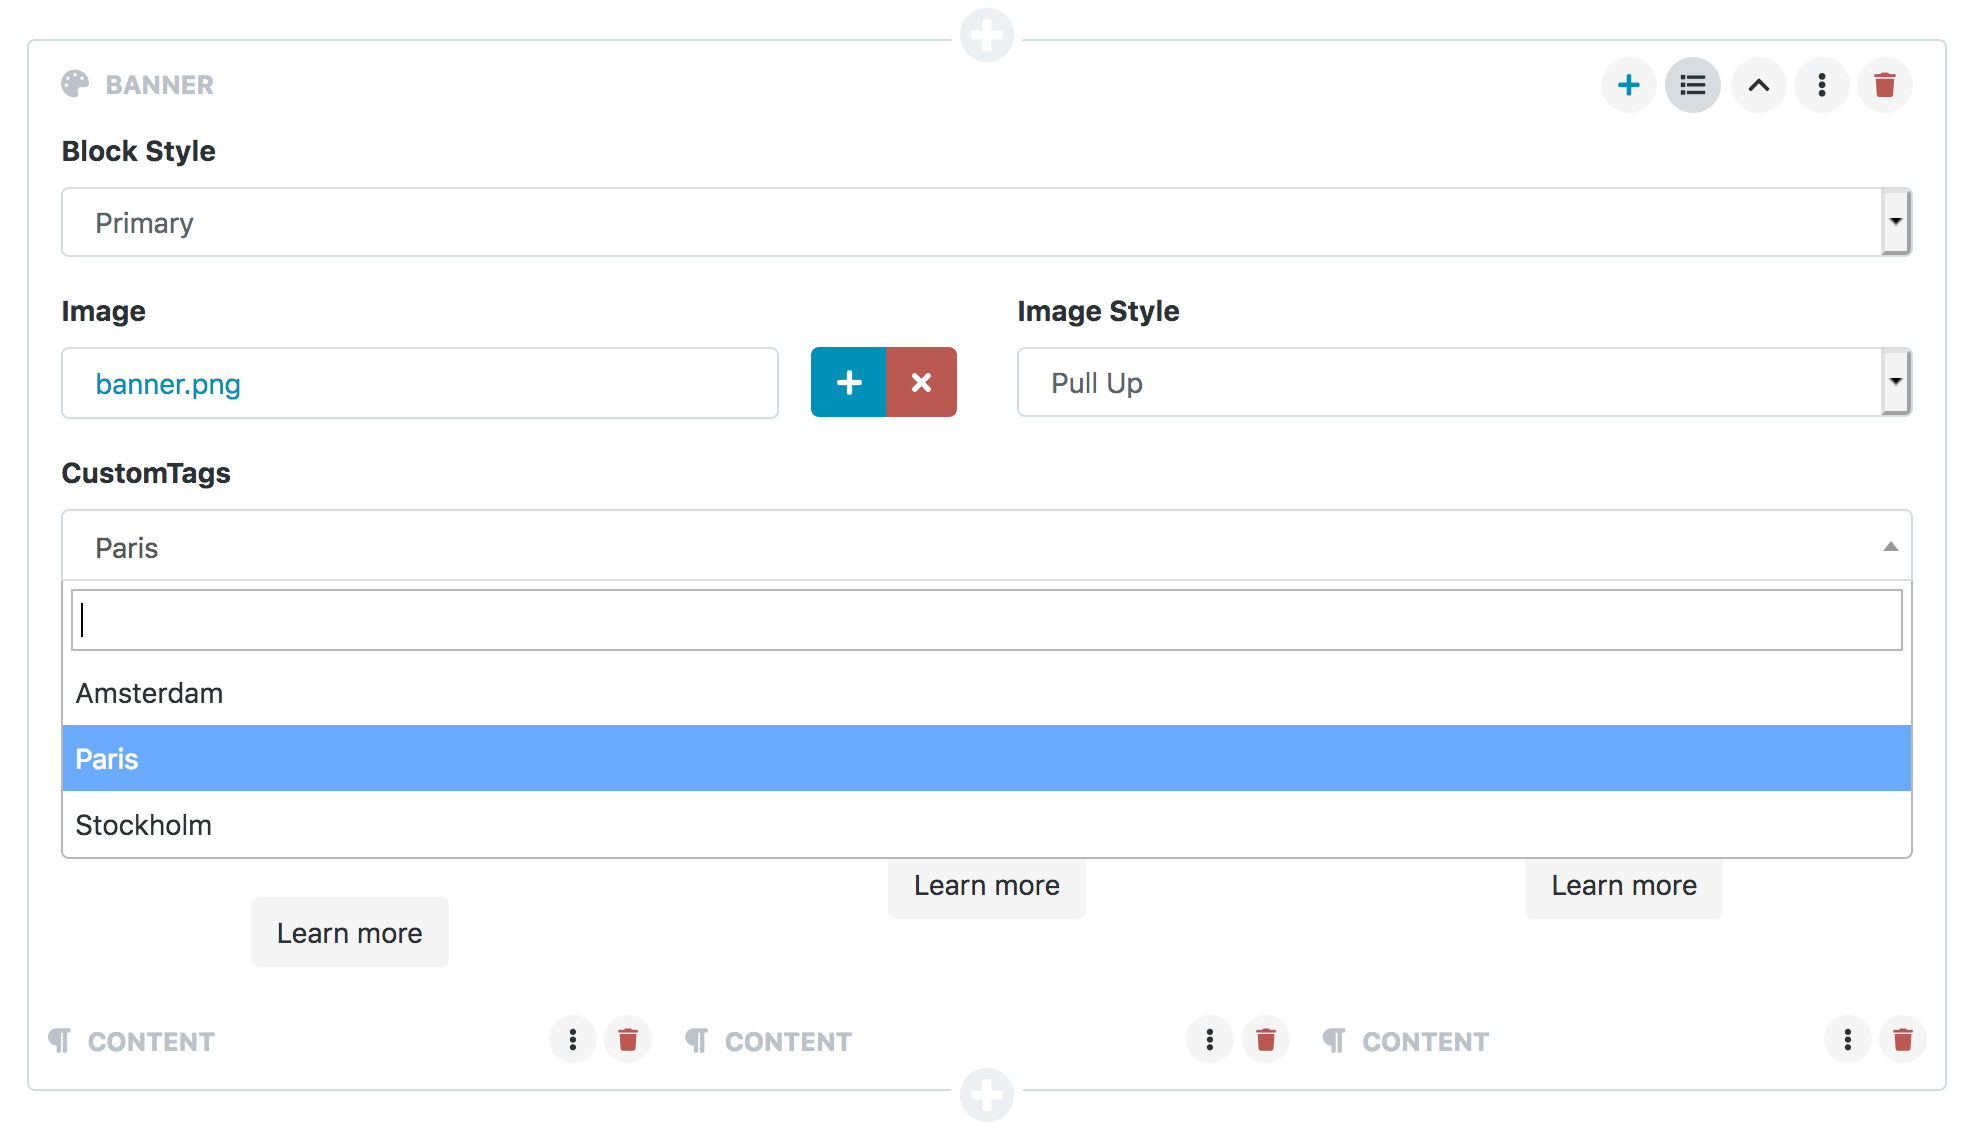
In the screenshot below I've added the field on a Block Group I had in an existing project. Not the main intention with the field, but it just shows that once you've created a field you can reuse it in numerous places of the content model :)
Summary
I hope you found this short example helpful for creating custom fields for Piranha CMS. It covers the most basic parts for creating fields in terms of Serializers, Vue Components and Custom Resources. As a bonus we also used the built-in Params as storage.